
External applications can access Golive data and trigger executions of actions in Golive through its Rest API.
"External applications" can be anything:
-
A deployment tool (like XL Deploy or Spinnaker) or,
-
Any other application that is able to use a Rest API.
All operations performed manually from the Golive User Interface (in Jira) can be automated using the Rest API.
Tip
Webhooks enables Golive to send web requests to external systems. Combining Rest API with Webhooks enables powerful bi-directional integrations!
Use the REST API Browser
Step 1 : Generate the API Token
Golive Rest API access requires authentication. When using the API browser from your Jira instance, your current session is used. If you want to call the API out of a browser/Jira instance, from a CI for example, you need to authenticate your calls by adding a custom HTTP header named api-key containing a Golive API token.
Tip
You can also use an api-token in a standard Bearer authentication header.
To generate the token:
-
Click the gear icon located on the upper right corner of any Golive page.
-
From the drop down, select Integration Hub.
-
Go to the API Token tab.
-
Click Generate new token.
Tokens are generated for a given user and so, impersonate this user when used. Each of the actions executed with a given token will be done on behalf the user who generated the token.
It's recommended to create a dedicated Jira technical user account only for this purpose. Permissions can then be configured according to this user to decide what can be done or not with a given token.
You can see the list of already generated token, revoke & generate new ones:

In case a token has been compromised, you can revoke it and it will be rejected on next usage.
Step 2: Authorize API Requests
Once generated:
-
Copy the Token to the clipboard.
-
Go to the REST API tab.
-
Select Authorize.
-
Paste the Token and click Authorize.
Step 3: Make Requests
Now, let's try it:
-
Expand the Application section.
-
Select GET /applications.
-
Click Try it out to enable execution mode, and then on Execute to trigger the call:
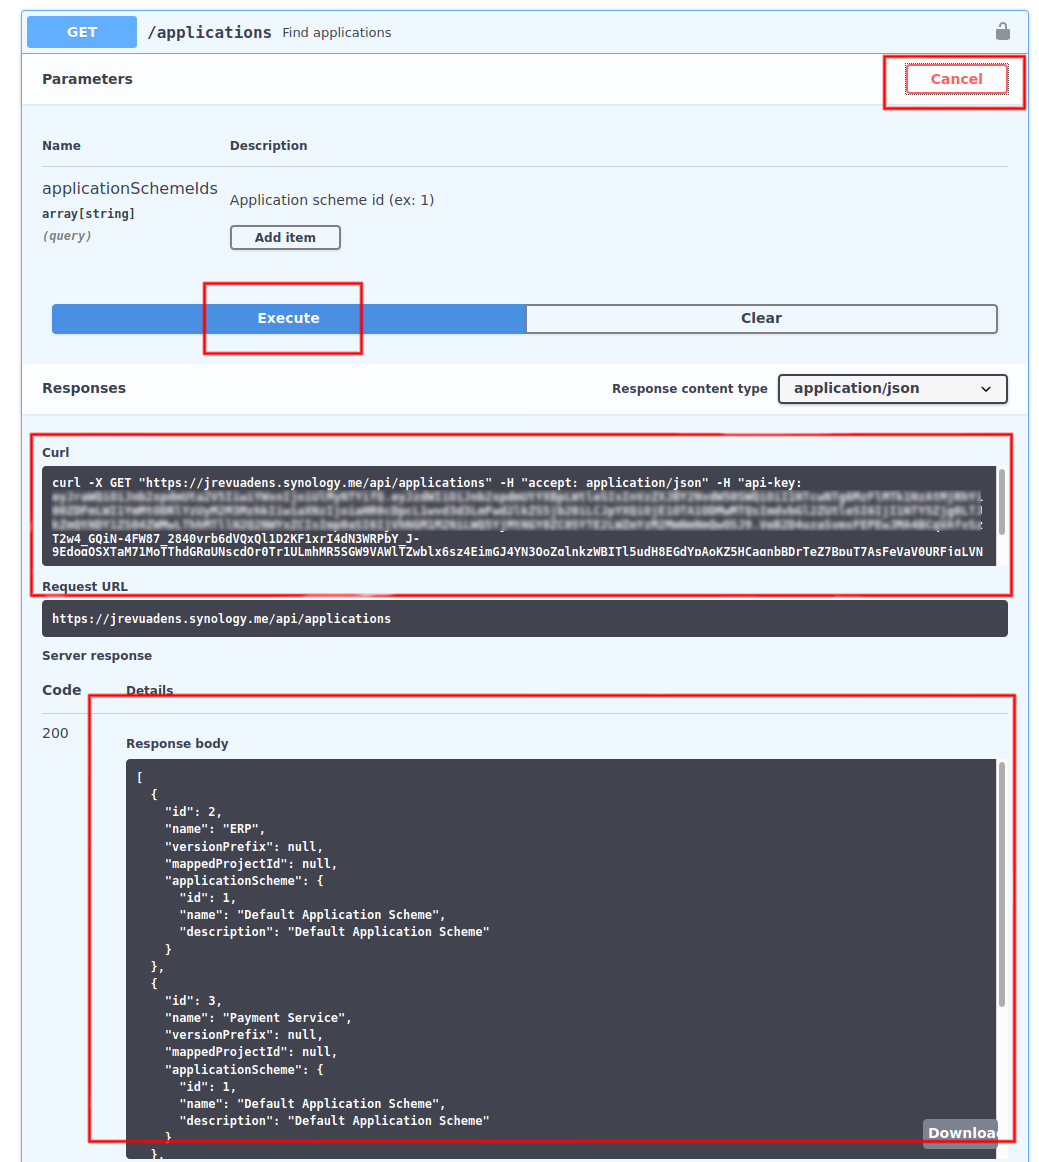
You see at the bottom of the screen in Response Body the response returned by the web service, and if you want to execute it in a different Environment, you can copy the curl command example which shows the addition of api-key header.
Jira Cloud REST API
If you are using Golive Cloud, you may need to update values of your Environments Custom Fields when you create or edit a Jira Issue using the Jira Rest API.
The official JIRA Cloud REST API documented here.
There is nothing specific to Golive when updating your Jira issues. To help you get quicker to the point, we provide below examples of curl scripts you can adapt an re-use for your own purpose.
You need to generate an Atlassian API token and have the permission to create/update issue in order to modify/create issues using the Atlassian REST API.
Set Environments to New Issue
The value of an Environment customfield is stored and set using an array of numerical ids (ex: [2,34,4])
Simply set the list of ids of the environments you want to set for an environment customfield (ex: customfield_10037), in the "fields" object at the root of the json posted as body to your POST, as in the example below:
curl --request POST \
  --url 'https://{your-domain}.atlassian.net/rest/api/3/issue' \
  --user '{user@youremail.com}:{api-token}' \
  --header 'Accept: application/json' \
  --header 'Content-Type: application/json' \
  --data '{
  "fields": {
    "summary": "This is a test request from Curl",
    "issuetype": {
      "id": "10004"
    },
    "project": {
      "key": "GOT"
    },
    "customfield_10037": [2,34,4]
  }
}'
Add/Remove Environment to Issue
You can define "add" and "remove" operations in order to add/remove an environment to an existing customfield (ex: customfield_10037) of an existing issue, as in the example below:
curl --request PUT \
  --url 'https://{your-domain}.atlassian.net/rest/api/3/issue/{issueKey}' \
  --user '{user@youremail.com}:{api-token}' \
  --header 'Accept: application/json' \
  --header 'Content-Type: application/json' \
  --data '{
  "update": {
    "customfield_10037": [
      {
        "add": 3
      },
      {
        "remove": 4
      }
    ]
  }
}'
Set Environments of an Issue
You can replace all existing environments of an existing customfield (ex: customfield_10037) of an existing issue, as in the example below:
curl --request PUT \
  --url 'https://{your-domain}.atlassian.net/rest/api/3/issue/{issueKey}' \
  --user '{user@youremail.com}:{api-token}' \
  --header 'Accept: application/json' \
  --header 'Content-Type: application/json' \
  --data '{
  "update": {
    "customfield_10037": [
      {
        "set": [4,5]
      }
    ]
  }
}'
Swagger.json File
You can download a swagger.json file (from the REST API browser) to generate server stubs or client SDKs in various languages:
https://swagger.io/tools/swagger-codegen
Automation
Using a tool like Postman (free version), you can easily use and test the Golive Rest API.
For instance, if you have hundreds of Environments in an Excel file and would like to load them in Golive, you can do it automatically with our Rest API and Postman, instead of adding them one by one from the user interface.
Here is an example of Data Import with Golive Cloud (it works similarly for Golive Server/DC)
Additional Resources
How to Browse the Rest API
Use the Rest API to Replicate or Export your Environments
Questions?
If you need help with your integrations, feel free to contact us.