In this article, you’ll find detailed instructions on how to set up the Scheduling Configuration.
Requirements
-
Ensure that your Environments are already defined in Golive. Refer to our Get started documentation for detailed instructions.
-
Ensure your Jira instance is configured with the relevant custom fields, issue types, screens, and workflows before completing the Golive Scheduling Configuration. Jira Administrators can refer to the Get Started with Scheduling article to learn best practices for this configuration.
Setting up Scheduling Configuration
-
In Golive, click the the gear icon at the top right corner of any Golive Page.
-
From the drop-down menu, select Golive Settings.
-
In the Scheduling section, select Scheduling Configuration.
-
Decide whether you'll schedule on a Timestamp or Day basis.
-
Choose the appropriate tab (Booking, Change, Blackout) correspondent to the type of event you want to schedule.
-
Use the Enable toggle to activate the scheduling.
-
Fill out the following fields:
-
Jira Project: Select from the list of available Jira Projects.
-
Issue Type: Choose from the available Issue Types configured in the selected Jira project.
Info
Sub-task issues can be rescheduled but not created from the timeline.
Info
[Jira Project] + [Issue Type] should be unique across all Event Types.
-
Environment field: Select from the list of Golive Environment Fields present in the issue creation screen.
-
Start time field: Choose from the list of Date or DateTime fields (depending on the scheduling scheme setup) present in the issue creation screen.
-
End time field: Choose from the list of Date or DateTime fields (depending on the scheduling scheme setup) present in the issue creation screen.
-
Conflict trigger status: Select from the list of statuses present in the issue workflow. When the Jira issue reaches this status, Golive will automatically detect potential conflicts.
-
Confirmed statuses: Choose from the list of statuses present in the issue workflow. When the Jira issue is in those statuses, the request will be considered confirmed and taken into account for conflict detection.
-
Link conflicting Jira issues: Toggle to enable/disable (disabled by default). When enabled and when a conflict is detected, conflicting Jira issues are linked together.
-
Link name: Select from the list of available link names.
-
Tip
We recommend creating a new link named “Conflict”, to be used specifically for the scheduling. A new link type can be added from Jira Settings > Issues > Issue linking.
-
Auto-approval: Toggle to enable/disable (disabled by default). When enabled and the request is in the Conflict trigger status, it will be transitioned to Approved (if no conflict is detected) or Rejected status (if one or more conflicts are detected):
-
Approved status: Choose from the list of statuses present in the issue workflow.
-
Rejected status: Choose from the list of statuses present in the issue workflow or select don’t change if you want the request to remain in the Trigger status when a conflict is detected.
-
-
Allow exclusive booking: Toggle to enable/disable (disabled by default).
-
Exclusive option field: Select from the fields present in the issue creation screen. Only the Single Select List or Dropdown fields having a Yes option are supported.
-
Info
The Allow exclusive booking option is not available for Blackout Event Type, as Blackout events are always exclusive.
-
Auto-Book dependent environments: Toggle to enable/disable (disabled by default). When enabled, environments added as dependencies are added to the Dependent Environment field.
-
Dependent environments field: Select from the list of all Golive Environment Fields.
-
Check conflicts on dependencies: Toggle to enable/disable (enabled by default). When enabled, dependent environments are taken into account for checking potential conflicts.
-
-
Conflict Policy
The Golive Conflict Policy is utilized for identifying conflicts between scheduled events, as outlined in the table below:
|
|
Exclusive Booking |
Non-exclusive Booking |
Exclusive Change |
Non-exclusive Change |
Blackout |
|---|---|---|---|---|---|
|
Exclusive Booking |
Conflict |
Conflict |
Conflict |
Conflict |
Conflict |
|
Non-exclusive Booking |
Conflict |
OK |
Conflict |
OK |
Conflict |
|
Exclusive Change |
Conflict |
Conflict |
Conflict |
Conflict |
Conflict |
|
Non-exclusive Change |
Conflict |
OK |
Conflict |
OK |
Conflict |
|
Blackout |
Conflict |
Conflict |
Conflict |
Conflict |
Conflict |
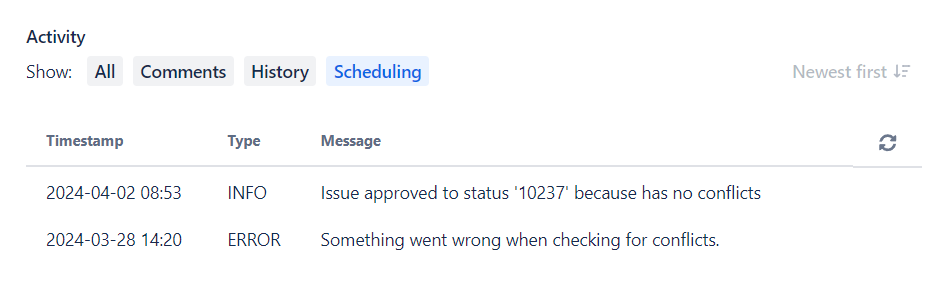
Scheduling Activity Tab
An Scheduling Activity Tab is located next to the Comments section of Jira work items. This tab serves as an audit log for all scheduling activities executed by Golive. It provides both ERROR and INFO messages to facilitate conflict checking and troubleshooting when necessary.
Important
There's a known bug in Jira causing the Scheduling tab to fail to open if you click on the Scheduling tab before the page has fully loaded. In such cases, simply reload the page in your browser and wait for it to fully load before attempting to access Scheduling.