
This article provides Jira administrators with step-by-step instructions for manually configuring Jira to schedule Environments using Golive.
Important
While this approach offers flexibility, it is recommended only for experienced Jira administrators. For most users, we strongly advise using the Quick Setup option for a simpler and more efficient configuration. For detailed instructions, refer to the Get Started with Scheduling article.
Requirements
-
Jira Administrator permission on your Jira instance.
-
The Custom Configuration is intended for Jira Administrators familiar with Jira administration concepts. Before proceeding with this configuration, ensure that you have a solid understanding of:
-
Jira Projects.
-
Custom Fields.
-
Screens.
-
Screen Schemes.
-
Workflows.
-
Workflow Schemes.
-
Issue Types.
-
Issue Type Schemes.
-
Issue Type Screen Schemes.
-
Issue Linking.
-
Tip
Atlassian University offers complimentary course
Best Practices
Info
Scheduling processes may vary across organizations, so tailor the configuration to meet your specific requirements.
1. Jira Project
We recommend creating a dedicated company-managed Jira Project specifically for scheduling your Environments, such as naming it “Test Environment Management” (TEM). While team-managed and Jira Work Management projects are also compatible, it's important to note that in these cases, distinguishing between creation and edit screens is not possible. Consequently, you'll have the ability to modify the environment field as well as start/end time fields post approval of your Event types (Booking, Change, Blackout).
2. Issue Types
Create one Issue Type per Event Type in your Jira Project:
-
Environment Booking Issue Type.
-
Environment Change Issue Type.
-
Environment Blackout Issue Type.
Customize the names and avatars as needed. For example, you can use the Freeze issue type to track Blackouts.
3. Custom Fields
Create three mandatory custom fields for each Issue Type:
-
Golive Custom Field to store the Environments linked to your Events. You can name it “Environment(s)”.
-
Jira Custom Field of type Date Time Picker to store the beginning of your Events. You can name it “Start time”.
-
Jira Custom Field of type Date Time Picker to store the end of your Events. You can name it “End time”.
Info
Golive also offers support for Date Picker fields rather than Date Time Picker fields. However, we recommend utilizing the Date Time Picker due to its greater flexibility. It's important to ensure uniformity in the type of scheduling fields across all event types (Booking, Change, Blackout).
Info
If you're using a team-managed Jira Project, the type of your date fields should be Time stamp (recommended) or Date.
4. Exclusive Field (Optional)
Optionally, you can schedule Exclusive Bookings and Changes to ensure that no other Booking or Change can be scheduled for the same slot. To enable this feature, a new Exclusive field should be added.
-
Jira Custom Field of type Single Select List with two options: Yes and No. You can name it “Exclusive”.
Info
If you're using a team-managed Jira Project, the type of this field should be Dropdown.
5. Environment Field for Dependencies (Optional)
Optionally, you can automatically book dependent Environments. To enable this feature, add an additional Dependent Environment.
-
Golive Custom Field to store the dependent Environments linked to your Events. You can name it “Dependent Environments”.
6. Jira Screens
After creating the required custom fields, you can create 4 different screens:
-
Scheduling Creation Screen.
-
Scheduling View Screen.
-
Scheduling Edit Screen.
-
Scheduling Transition Screen.
And add the fields according to the following table:
|
Field |
Creation |
View |
Edit |
Transition |
|---|---|---|---|---|
|
Summary |
X |
X |
X |
|
|
Environment(s) |
X |
X |
|
X |
|
Dependent Environments (optional) |
|
X |
|
|
|
Start time |
X |
X |
|
X |
|
End time |
X |
X |
|
X |
|
Exclusive (optional) |
X |
X |
|
X |
7. Workflows
Booking, Change, and Blackout workflows should align with your scheduling processes. To illustrate, here's a straightforward workflow that several of our customers have adopted:
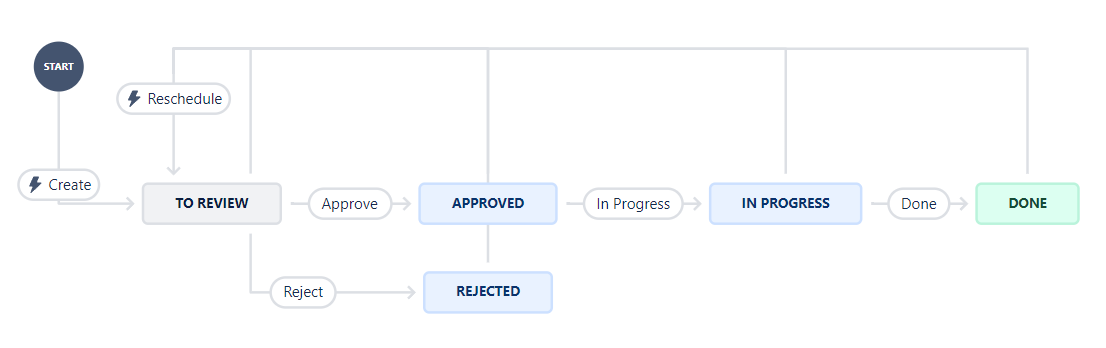
All statuses have a Reschedule transition pointing to In Review, which is the trigger status for the Golive conflict checker.
8. Issue Link (Optional)
Optionally, Golive can automatically link conflicting scheduling events together. For that, we recommend creating a new Issue Link (Jira Settings > Issues > Issue linking) with the following information:
-
Name: Conflict
-
Outward Description: Conflicts with
-
Inward Description: Conflicts with
9. Scheduling Configuration
Once the setup is complete, proceed with your Golive Scheduling Configuration as explained in the Scheduling Configuration article. This configuration example is based on the guidelines provided in this article.