
Environment Custom Fields are used to link Jira work items and Service Management Requests with Golive Environments. This article explains why to use them, how to create them, and how to configure and use them.
Why Use Environment Custom Fields
Environment Custom Fields allow teams to associate Jira work items with Golive Environments. This helps you track accurate statistics, such as the number of issues created, reproduced, or tested in specific environments.
For example, you can create the following Environment Custom Fields for your "Bug" work items:
-
Detected in: The Environment where a new issue was identified.
-
Tested in: The Environment where a fixed issue was tested.
They can be integrated into workflows that involve your Environments, such as:
-
Change approvals
-
Deployment requests
-
Environments bookings
Info
Environment Custom Fields work similar to the Version concept in Jira. Like Versions, where multiple fields (e.g., Fix Version/s and Affects Version/s) use the same inventory, Environment Custom Fields draw from a single list of Environments but can appear in multiple fields on the same issue.
Scheduling Configuration
When you follow the Get Started with Scheduling documentation, the Quick Setup will create two custom fields for you:
-
Environments: The Environments linked to a booking, change or blackout.
-
Dependent Environments: The Environments depending on the environments listed in the Environments field.
Create an Environment Custom Field
Requirements
You must have the Jira Administrator permission to create new custom fields from the Environment Custom Field section. For detailed information, refer to the Security & Permissions documentation.
Steps
-
Click the gear icon located on the upper right corner of Golive pages.
-
From the drop-down menu, select Golive Settings.
-
In the Environments section, select Custom Fields.
-
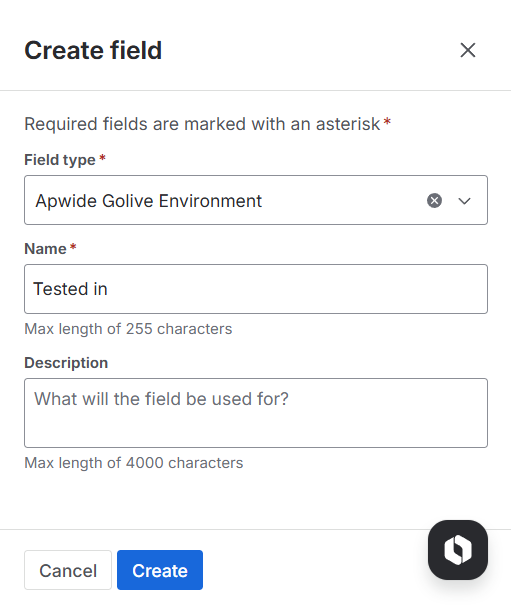
On the Custom Fields Settings page, click Create Field.
-
On the Jira Fields page, click Create new field.
-
In the Field type field, select Apwide Golive Environment.
-
In the Name field, type the name of your new custom field, for instance “Tested in”.
-
Click Save.
To make the Custom Field visible in issue types, add it to your screens:
-
For company-managed projects, refer to: Add a custom field to a screen.
-
For team-managed projects, refer to: Add a custom field to a team-managed project.
Update the Configuration of a Field
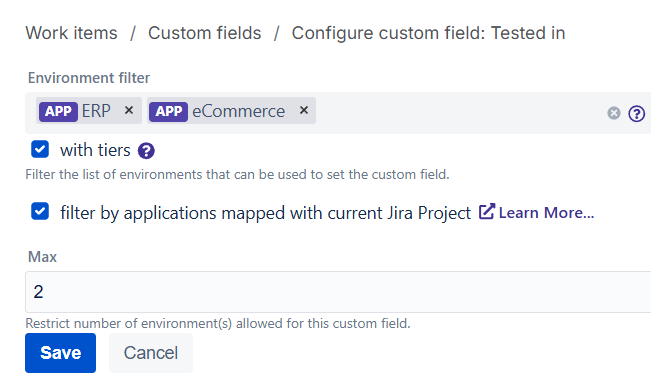
By default, an Environment Custom Field includes all Environments from applications linked to the Jira project. You can restrict this behavior if needed.
Requirements
You must be a Jira Administrator.
Steps
-
Click the gear icon located on the upper right corner of Golive pages.
-
From the drop-down menu, select Golive Settings.
-
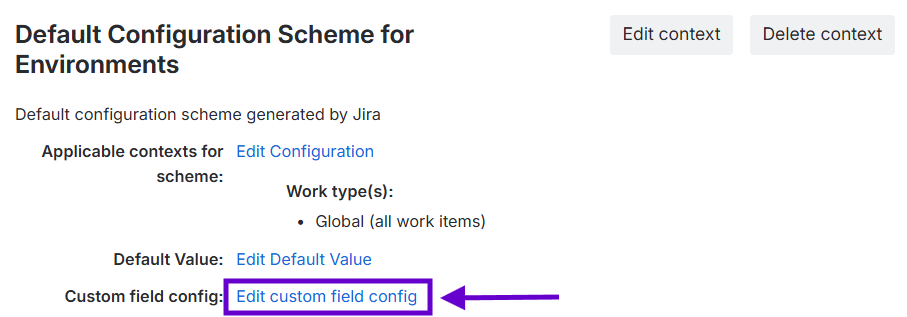
In the Environments section, select Custom Fields.
-
Next to the field your want to configure, click the pencil icon (Edit).
-
For the relevant context, click Edit custom field config.
Select Environments on the Issue Screen
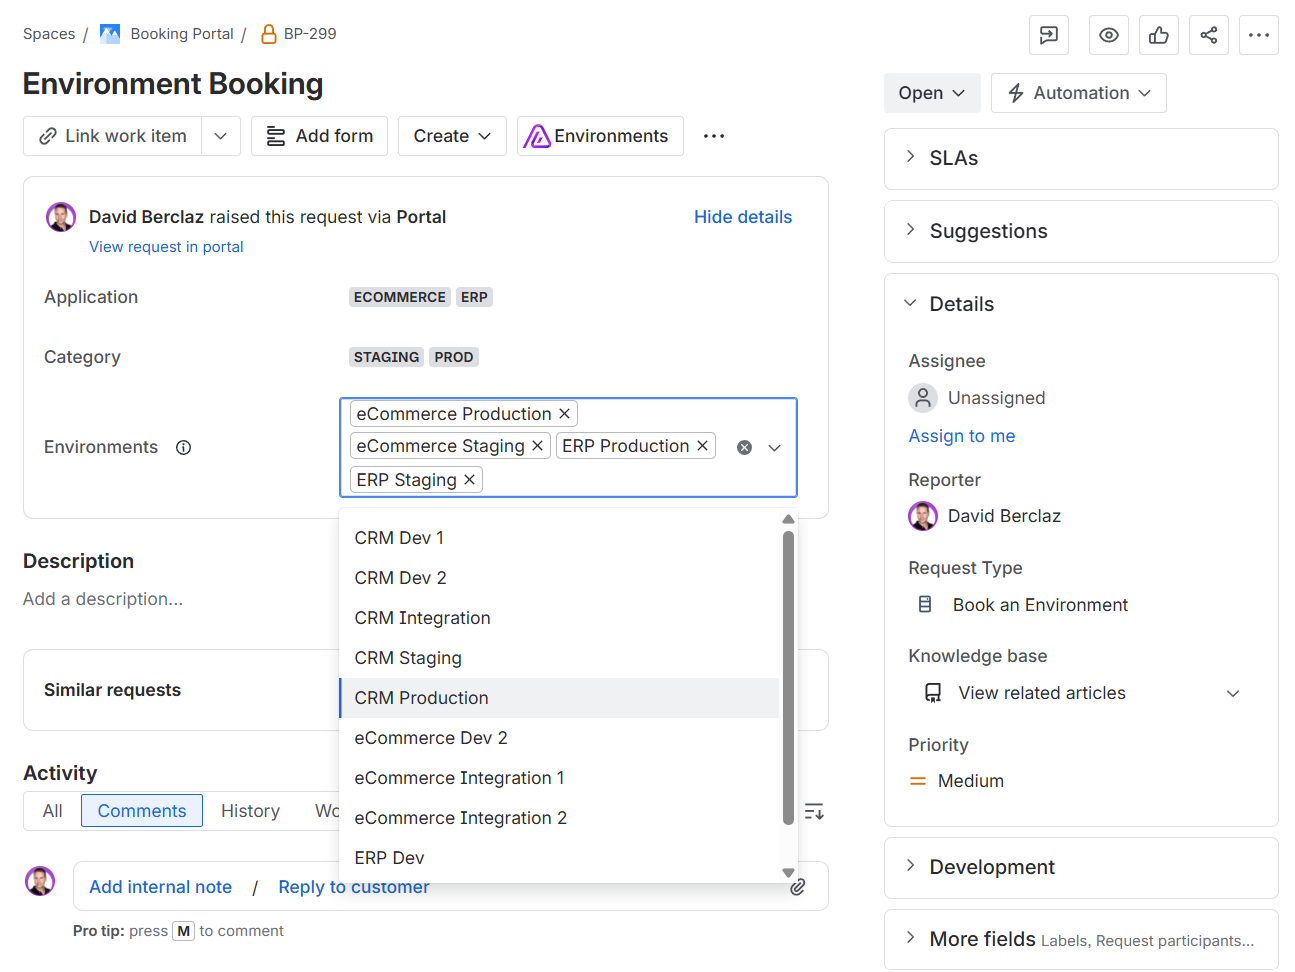
Once you’ve configured an Environment Custom Field and added it to a screen, you can easily select Environments directly from the Issue Screen in Jira.
Requirements
-
Available Environments depend on your Project and Application setup.
-
By default, Jira shows only Environments linked to the applications associated with the current project.
Steps
-
Open the Jira Issue you want to work with.
-
Locate the Environments field on the right side of the Issue screen.
-
Search for and select one or more Environments.
Tip
To remove an Environment, click the x icon next to it.
Automation
In advanced scenarios where you want to create or update issue environments through Jira Automation, you can leverage Golive and Jira Cloud REST API to dynamically set or modify environment values as part of your workflows.
This allows you to configure issues programmatically, streamline environment management, and ensure data consistency across your project.
To learn more about how to implement this capability, refer to our Rest API documentation.