
Jira issues contain a significant amount of date-related information, including Creation, Resolution, Due dates, and Custom date fields.
Linking Jira issues to Environments through Environment Custom Fields enables direct integration with Golive Timelines, enhancing management and visibility. This makes them ideal candidates as Events on Golive Timelines.
Info
To maximize the utility of Issue Calendars, it's essential to familiarize yourself with their basic concepts and features. If you're new to Calendars, refer to the Understand Timeline Core Concepts article.
Requirements
Before setting up the Jira Issues Calendar, ensure that you are familiar with basic concepts and Calendar features described in the Timeline Core Concepts article.
Create a Jira Issues Calendar
Requirements
You must be Golive Administrator or Timeline Owner.
Steps
-
Access the Timeline where you wish to create a Jira Issues Calendar.
-
Click Edit at the top right corner of the page.
-
Click + Add a Calendar in the Calendars section on the right of the screen.
-
Select + Create a new calendar at the bottom of the list.
-
Choose Jira Issues.
-
You can switch between Basic and Advanced modes using the toggle in the top-right corner:
Basic Mode
-
Choose the desired Jira Project.
-
Select the appropriate Issue Type.
-
In the second section, map the following fields to your issue type:
-
Start date
-
End date
-
Environments(s)
-
Version(s)
-
-
Use the Filters section to define additional filters.
Advanced Mode
-
Select a Jira Project, an existing Jira Filter, or craft your own Jira Query Language (JQL) query to specify the issues for the timeline.
-
Define Default Values for the Project and the Issue Type.
Info
These values will be automatically populated when creating issues from the timeline via drag-and-drop functionality.
-
In the Mapped Fields section, map the following fields to your issue type:
-
Start date
-
End date
-
Environments(s)
-
Version(s).
-
-
Use the Filters section to define additional filters.
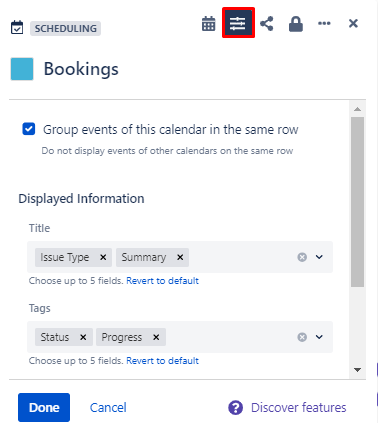
Customize Displayed Event Information
To customize the layout of your Calendar Events and display the information that matters most to you, follow these steps:
-
Access the Timeline you want to customize.
-
In the Calendars section on the right of the screen, hover over the desired Calendar.
-
Click the Actions button (three horizontal dots) to open the Calendar Details dialog.
-
In the Calendar Details dialog, select the Displayed Information section at the upper-right corner:
-
Choose which fields to display in each of the three areas: Title, Tags, and Details. You can also rearrange the fields by dragging and dropping them.
-
Click Done to apply your changes.
The selected fields will appear when clicking an Event on the Timeline.
Info
Only fields with non-empty values will be shown in the Title and Tags areas.
Create an Event
To create a new Event, you can use one of the following methods:
-
Dragging and Dropping
-
Using the Calendars Menu
Requirements
Triggering the creation of an event opens the Create Issue screen. Ensure you have the necessary Jira permissions to create new issues.
Dragging and Dropping
-
Access the Timeline where you want to add an event.
-
In the Calendars section on the right side of the screen, drag the desired Calendar and drop it onto the timeline at preferred time and date.
The Create Issue dialog will open automatically with the Start and End times pre-filled based on where you dropped the event on the Timeline.
Using the Calendars Menu
-
Access the Timeline where you want to add an event.
-
In the Calendars section, click on the desired Calendar to create an event.
Info
Alternatively, click the Calendar Actions button (three horizontal dots) and select Create Event.
This will open the Create Issue dialog. By using this method, you’ll have to manually enter Start and End times values.
Reschedule an Event
To reschedule an event, you can either resize or move it on the timeline. Follow the steps below:
Requirements
You need one of the following permissions to reschedule events:
-
PLAN Calendar permission.
-
PLAN OWN Calendar permission (for rescheduling your own events).
-
ADMIN Calendar permission.
-
Golive Administrator or Manage Calendars global permissions.
Resize
-
Access the Timeline where you want to reschedule an event.
-
Locate the Event on the timeline.
-
Drag the start or end of the event to adjust its start or end date.
Move
-
Access the Timeline where you want to reschedule an event.
-
Locate the Event on the timeline.
-
Click and hold the middle of the event.
-
Drag it to the new desired date and time on the timeline.
When you use either method, the Reschedule screen will appear. Confirm the following fields:
-
Environment(s) to book: Specifies the environment for the event.
-
Start time: Indicates the exact start date and time.
-
End time: Indicates the exact ending date and time.
-
Exclusive: Checkbox to set whether the rescheduled event should be exclusive or not.
Edit a Jira Issues Calendar
Requirements
You need one of the following:
-
EDIT or ADMIN permissions on the Calendar.
-
Global permissions: Golive Administrator or Manage Calendars.
Steps
-
Access the Timeline where you want to edit a Calendar.
-
In the Calendars section, locate the Calendar you want to edit.
-
Click the corresponding Actions button, represented by a three horizontal dots icon.
-
Click View/Edit.
-
Make any necessary changes.
-
Click Done.
Remove a Jira Issues Calendar
Info
This action unlinks the Calendar from the current Timeline. The Calendar remains available on other Timelines.
Requirements
You need one of the following:
-
Timeline Owner and View permission on the Calendar.
-
Golive Administrator global permission.
Steps
-
Access the Timeline where you want to remove a the Calendar.
-
Click Edit at the top right.
-
In the Calendars section, locate the calendar you want to remove.
-
Click the corresponding Actions button, represented by a three horizontal dots icon.
-
Click Remove.
Delete a Jira Issues Calendar
Important
This permanently deletes the Calendar from all Timelines.
Requirements
You need one of the following:
-
ADMIN Calendar permission.
-
Golive Administrator or Manage Calendars global permissions.
Steps
-
Access the Timeline where you want to delete a Calendar.
-
In the Calendars section, locate the Calendar you want to delete.
-
Click the corresponding Actions button (three horizontal dots).
-
Select View/Edit.
-
Click the Calendar Administration button (three horizontal dots).
-
Select Delete from the dropdown.
-
Click Delete once again to confirm.